Nav2 Stack Using RViz
In this tutorial, we will explore the ROS 2 navigation stack using slam_toolbox for mapping an environment and the core Nav2 packages to navigate in the mapped environment. If you want to know more about teleoperating the mobile base or working with the RPlidar 2D scanner on Stretch, we recommend visiting the previous tutorials on Teleoperating stretch and Filtering Laser Scans. These topics are a vital part of how Stretch's mobile base can be velocity controlled using Twist messages, and how the RPlidar's LaserScan messages enable Obstacle Avoidance for autonomous navigation.
Navigation is a key aspect of an autonomous agent because, often, to do anything meaningful, the agent needs to traverse an environment to reach a specific spot to perform a specific task. With a robot like Stretch, the task could be anything from delivering water or medicines for the elderly to performing a routine patrol of an establishment for security.
Stretch's mobile base enables this capability and this tutorial will explore how we can autonomously plan and execute mobile base trajectories. Running this tutorial will require the robot to be untethered, so please ensure that the robot is adequately charged.
Mapping
The first step is to map the space that the robot will navigate in. The offline_mapping.launch.py file will enable you to do this. First, run:
ros2 launch stretch_nav2 offline_mapping.launch.py
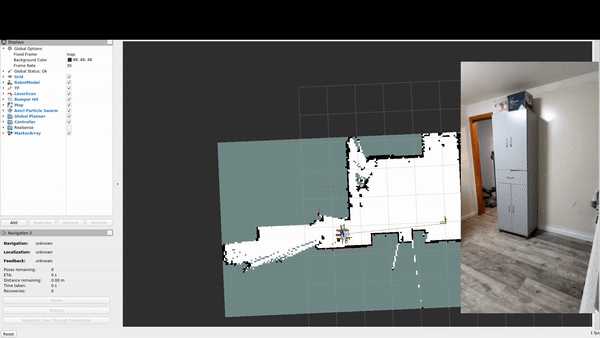
Rviz will show the robot and the map that is being constructed. Now, use the Xbox controller (see instructions below for using a keyboard) to teleoperate the robot around. To teleoperate the robot using the Xbox controller, keep the front left (LB) button pressed while using the right joystick for translation and rotation.
Avoid sharp turns and revisit previously visited spots to form loop closures.

In Rviz, once you see a map that has reconstructed the space well enough, open a new terminal and run the following commands to save the map to the stretch_user/ directory.
mkdir ${HELLO_FLEET_PATH}/maps
ros2 run nav2_map_server map_saver_cli -f ${HELLO_FLEET_PATH}/maps/<map_name>
Note
The <map_name> does not include an extension. The map_saver node will save two files as <map_name>.pgm and <map_name>.yaml.
Tip
For a quick sanity check, you can inspect the saved map using a pre-installed tool called Eye of Gnome (eog) by running the following command:
eog ${HELLO_FLEET_PATH}/maps/<map_name>.pgm
Navigation
Next, with <map_name>.yaml, we can navigate the robot around the mapped space. Run:
ros2 launch stretch_nav2 navigation.launch.py map:=${HELLO_FLEET_PATH}/maps/<map_name>.yaml
A new RViz window should pop up with a Startup button in a menu at the bottom left of the window. Press the Startup button to kick-start all navigation related lifecycle nodes. Rviz will show the robot in the previously mapped space, however, it's likely that the robot's location on the map does not match the robot's location in the real space. To correct this, from the top bar of Rviz, use 2D Pose Estimate to lay an arrow down roughly where the robot is located in real space. This gives an initial estimate of the robot's location to AMCL, the localization package. AMCL will better localize the robot once we pass the robot a 2D Nav Goal.
In the top bar of Rviz, use 2D Nav Goal to lay down an arrow where you'd like the robot to navigate. In the terminal, you'll see Nav2 go through the planning phases and then navigate the robot to the goal. If planning fails, the robot will begin a recovery behavior - spinning around 180 degrees in place or backing up.

Tip
If navigation fails or the robot becomes unresponsive to subsequent goals through RViz, you can still teleoperate the robot using an Xbox controller.
Note
The launch files expose the launch argument "teleop_type". By default, this argument is set to "joystick", which launches joystick teleop in the terminal with the Xbox controller that ships with Stretch. The Xbox controller utilizes a dead man's switch safety feature to avoid unintended movement of the robot. This is the switch located on the front left side of the controller marked "LB". Keep this switch pressed while translating or rotating the base using the joystick located on the right side of the Xbox controller.
If the Xbox controller is not available, the following commands will launch mapping or navigation, respectively, with keyboard teleop:
ros2 launch stretch_nav2 offline_mapping.launch.py teleop_type:=keyboard
or
ros2 launch stretch_nav2 navigation.launch.py teleop_type:=keyboard map:=${HELLO_FLEET_PATH}/maps/<map_name>.yaml
Simple Commander API
It is also possible to send 2D Pose Estimates and Nav Goals programmatically. In your own launch file, you may include navigation.launch to bring up the navigation stack. Then, you can send pose goals using the Nav2 simple commander API to navigate the robot programatically. We will explore this in the next tutorial.