Deep Perception
Ever wondered if there is a way to make a robot do awesome things without explicitly having to program it to do so? Deep Perception is a branch of Deep Learning that enables sensing the elements that make up an environment with the help of artificial neural networks without writing complicated code. Well, almost. The most wonderful thing about Stretch is that it comes preloaded with software that makes it a breeze to get started with topics such as Deep Learning. In this tutorial, we will deploy deep neural networks on Stretch using two popular Deep Learning frameworks, namely, PyTorch and OpenVino.
YOLOv5 with PyTorch
PyTorch is an open-source end-to-end machine learning framework that makes many pretrained production-quality neural networks available for general use. In this tutorial, we will use the YOLOv5s model trained on the COCO dataset.
YOLOv5 is a popular object detection model that divides a supplied image into a grid and detects objects in each cell of the grid recursively. The YOLOv5s model that we have deployed on Stretch has been pretrained on the COCO dataset which allows Stretch to detect a wide range of day-to-day objects. However, that’s not all, in this demo we want to go a step further and use this extremely versatile object detection model to extract useful information about the scene.
Extracting Bounding Boxes and Depth Information
Often, it’s not enough to simply identify an object. Stretch is a mobile manipulator and its job is to manipulate objects in its environment. But before it can do that, it needs information of where exactly the object is located with respect to itself so that a motion plan to reach the object can be generated. This is possible by knowing which pixels correspond to the object of interest in the image frame and then using that to extract the depth information in the camera frame. Once we have this information, it is possible to compute a transform of these points in the end effector frame for Stretch to generate a motion plan.
For the sake of brevity, we will limit the scope of this tutorial to drawing bounding boxes around objects of interest to point to pixels in the image frame and drawing a detection plane corresponding to depth pixels in the camera frame.
Warning
Running inference on Stretch results in a continuously high current draw by the CPU. Please ensure proper ventilation with the onboard fan. It is recommended to run the demo in tethered mode.
See It In Action
Go ahead and execute the following command to run the inference and visualize the detections in RViz:
ros2 launch stretch_deep_perception stretch_detect_objects.launch.py
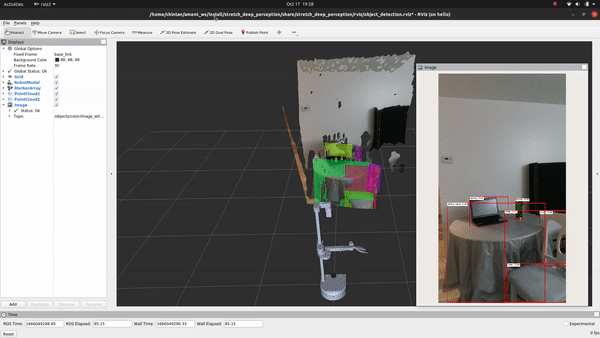
Voila! You just executed your first deep-learning model on Stretch!
Code Breakdown
Luckily, the stretch_deep_pereption package is extremely modular and is designed to work with a wide array of detectors. Although most of the heavy lifting in this tutorial is being done by the neural network, let's attempt to break down the code into functional blocks to understand the detection pipeline.
The control flow begins with executing the detect_objects.py script. In the main() function, we create an instance of the ObjectDetector class from the object_detect_pytorch.py script where we configure the YOLOv5s model. Next, we pass this detector to an instance of the DetectionNode class from the detection_node.py script and call the main function.
def main():
    confidence_threshold = 0.0
    detector = od.ObjectDetector(confidence_threshold=confidence_threshold)
    default_marker_name = 'object'
    node_name = 'DetectObjectsNode'
    topic_base_name = 'objects'
    fit_plane = False
    node = dn.DetectionNode(detector, default_marker_name, node_name, topic_base_name, fit_plane)
    node.main()
Let's skim through the object_detect_pytorch.py script to understand the configuration. The constructor is where we load the pretrained YOLOv5s model using the torch.hub.load() PyTorch wrapper. We set the confidence threshold to be 0.2, which says that a detection is only considered valid if the probability is higher than 0.2. This can be tweaked, although lower numbers often result in false positives and higher numbers often disregard blurry or smaller valid objects.
class ObjectDetector:
    def __init__(self, confidence_threshold=0.2):
        # Load the models
        self.model = torch.hub.load('ultralytics/yolov5', 'yolov5s')  # or yolov5m, yolov5l, yolov5x, custom
        self.confidence_threshold = confidence_threshold
The apply_to_image() method passes the stream of RGB images from the realsense camera to the YOLOv5s model and returns detections in the form of a dictionary consisting of class_id, label, confidence and bouding box coordinates. The last part is exactly what we need for further computations.
def apply_to_image(self, rgb_image, draw_output=False):
        results = self.model(rgb_image)

        ...

        if draw_output:
            output_image = rgb_image.copy()
            for detection_dict in results:
                self.draw_detection(output_image, detection_dict)

        return results, output_image
This method calls the draw_detection() method to draw bounding boxes with the object labels and confidence thresholds over detected objects in the image using OpenCV.
def draw_detection(self, image, detection_dict):
        ...

        cv2.rectangle(image, (x_min, y_min), (x_max, y_max), color, rectangle_line_thickness)

        ...

        cv2.rectangle(image, (label_x_min, label_y_min), (label_x_max, label_y_max), (255, 255, 255), cv2.FILLED)
        cv2.putText(image, output_string, (text_x, text_y), font, font_scale, line_color, line_width, cv2.LINE_AA)
Next, the script detection_node.py contains the class DetectionNode which is the main ROS node that subscribes to the RGB and depth images from the realsense camera and feeds them to the detector to run inference. The image_callback() method runs in a loop to subscribe to synchronized RGB and depth images. The RGB images are then rotated 90 degrees and passed to the apply_to_image() method. The returned output image is published on the visualize_object_detections_pub publisher, while the detections_2d dictionary is passed to the detections_2d_to_3d() method for further processing and drawing the detection plane. For detectors that also return markers and axes, it also publishes this information.
def image_callback(self, ros_rgb_image, ros_depth_image, rgb_camera_info):
        ...

        detection_box_image = cv2.rotate(self.rgb_image, cv2.ROTATE_90_CLOCKWISE)

        ...

        detections_2d, output_image = self.detector.apply_to_image(detection_box_image, draw_output=debug_output)

        ...

        if output_image is not None:
            output_image = ros2_numpy.msgify(Image, output_image, encoding='rgb8')
            if output_image is not None:
                self.visualize_object_detections_pub.publish(output_image)

        detections_3d = d2.detections_2d_to_3d(detections_2d, self.rgb_image, self.camera_info, self.depth_image, fit_plane=self.fit_plane, min_box_side_m=self.min_box_side_m, max_box_side_m=self.max_box_side_m)

        ...

        if self.publish_marker_point_clouds:
            for marker in self.marker_collection:
                marker_points = marker.get_marker_point_cloud()
                self.add_point_array_to_point_cloud(marker_points)
                publish_plane_points = False
                if publish_plane_points:
                    plane_points = marker.get_plane_fit_point_cloud()
                    self.add_point_array_to_point_cloud(plane_points)
            self.publish_point_cloud()
        self.visualize_markers_pub.publish(marker_array)
        if axes_array is not None:
            self.visualize_axes_pub.publish(axes_array)
Face Detection, Facial Landmarks Detection and Head Pose Estimation with OpenVINO and OpenCV
Detecting objects is just one thing Stretch can do well, it can do much more using pretrained models. For this part of the tutorial, we will be using Intel’s OpenVINO toolkit with OpenCV. The cool thing about this demo is that it uses three different models in tandem to not just detect human faces, but also important features of the human face such as the eyes, nose and the lips with head pose information. This is important in the context of precise manipulation tasks such as assisted feeding where we want to know the exact location of the facial features the end effector must reach.
OpenVINO is a toolkit popularized by Intel to optimize and deploy machine learning inference that can utilize hardware acceleration dongles such as the Intel Neural Compute Stick with Intel based compute architectures. More convenient is the fact that most of the deep learning models in the Open Model Zoo are accessible and configurable using the familiar OpenCV API with the opencv-python-inference-engine library.
With that, let’s jump right into it!
Warning
Running inference on Stretch results in a continuously high current draw by the CPU. Please ensure proper ventilation with the onboard fan. It is recommended to run the demo in tethered mode.
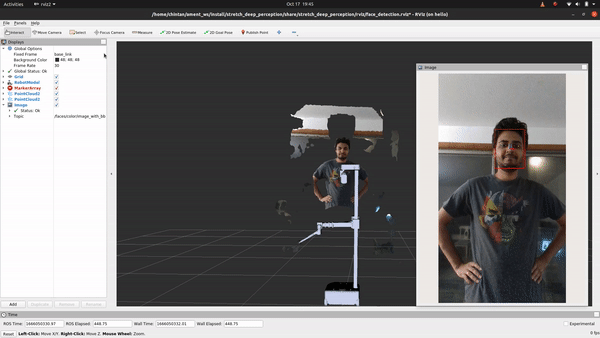
See It In Action
First, let’s execute the following command to see what it looks like:
ros2 launch stretch_deep_perception stretch_detect_faces.launch.py
Code Breakdown
Ain't that something! If you followed the breakdown in object detection, you'll find that the only change if you are looking to detect faces, facial landmarks or estimat head pose instead of detecting objects is in using a different deep learning model that does just that. For this, we will explore how to use the OpenVINO toolkit. Let's head to the detect_faces.py node to begin.
In the main() method, we see a similar structure as with the object detction node. We first create an instance of the detector using the HeadPoseEstimator class from the head_estimator.py script to configure the deep learning models. Next, we pass this to an instance of the DetectionNode class from the detection_node.py script and call the main function.
    ...

    detector = he.HeadPoseEstimator(models_directory,
                                    use_neural_compute_stick=use_neural_compute_stick)
    default_marker_name = 'face'
    node_name = 'DetectFacesNode'
    topic_base_name = 'faces'
    fit_plane = False
    node = dn.DetectionNode(detector,
                            default_marker_name,
                            node_name,
                            topic_base_name,
                            fit_plane,
                            min_box_side_m=min_head_m,
                            max_box_side_m=max_head_m)
    node.main()
In addition to detecting faces, this class also enables detecting facial landmarks as well as estimating head pose. The constructor initializes and configures three separate models, namely head_detection_model, head_pose_model and landmarks_model, with the help of the renamed_cv2.dnn.readNet() wrappers. Note that renamed_cv2 is simply the opencv_python_inference_engine library compiled under a different namespace for use with Stretch so as not to conflict with the regular OpenCV library and have functionalities from both available to users concurrently.
class HeadPoseEstimator:
    def __init__(self, models_directory, use_neural_compute_stick=False):
        ...

        self.head_detection_model = renamed_cv2.dnn.readNetFromCaffe(head_detection_model_prototxt_filename, head_detection_model_caffemodel_filename)
        dm.print_model_info(self.head_detection_model, 'head_detection_model')

        ...

        self.head_pose_model = renamed_cv2.dnn.readNet(head_pose_weights_filename, head_pose_config_filename)

        ...

        self.landmarks_model = renamed_cv2.dnn.readNet(landmarks_weights_filename, landmarks_config_filename)
The apply_to_image() method calls individual methods like detect_faces(), estimate_head_pose() and detect_facial_landmarks() that each runs the inference using the models we configured above. The bounding_boxes from the face detection model are used to supply the cropped image of the faces to head pose and facial landmark models to make their job way more efficient.
 def apply_to_image(self, rgb_image, draw_output=False):
        ...

        boxes = self.detect_faces(rgb_image)

        facial_landmark_names = self.landmark_names.copy()
        for bounding_box in boxes:
            if draw_output:
                self.draw_bounding_box(output_image, bounding_box)
            yaw, pitch, roll = self.estimate_head_pose(rgb_image, bounding_box, enlarge_box=True, enlarge_scale=1.15)
            if yaw is not None:
                ypr = (yaw, pitch, roll)
                if draw_output:
                    self.draw_head_pose(output_image, yaw, pitch, roll, bounding_box)
            else:
                ypr = None
            landmarks, landmark_names = self.detect_facial_landmarks(rgb_image, bounding_box, enlarge_box=True, enlarge_scale=1.15)
            if (landmarks is not None) and draw_output:
                self.draw_landmarks(output_image, landmarks)
            heads.append({'box':bounding_box, 'ypr':ypr, 'landmarks':landmarks})

        return heads, output_image
The detecion_node.py script then takes over as we saw with the object detection tutorial to publish the detections on pertinent topics.
Now go ahead and experiment with a few more pretrained models using PyTorch or OpenVINO on Stretch. If you are feeling extra motivated, try creating your own neural networks and training them. Stretch is ready to deploy them!