ArUco Marker Detection
ArUco Marker Detector
For this tutorial, we will go over how to detect Stretch's ArUco markers and review the files that hold the information for the tags.
Visualize ArUco Markers in RViz
Begin by running the stretch driver launch file.
roslaunch stretch_core stretch_driver.launch
To activate the RealSense camera and publish topics to be visualized, run the following launch file in a new terminal.
roslaunch stretch_core d435i_low_resolution.launch
Next, in a new terminal, run the stretch ArUco launch file which will bring up the detect_aruco_markers node.
roslaunch stretch_core stretch_aruco.launch
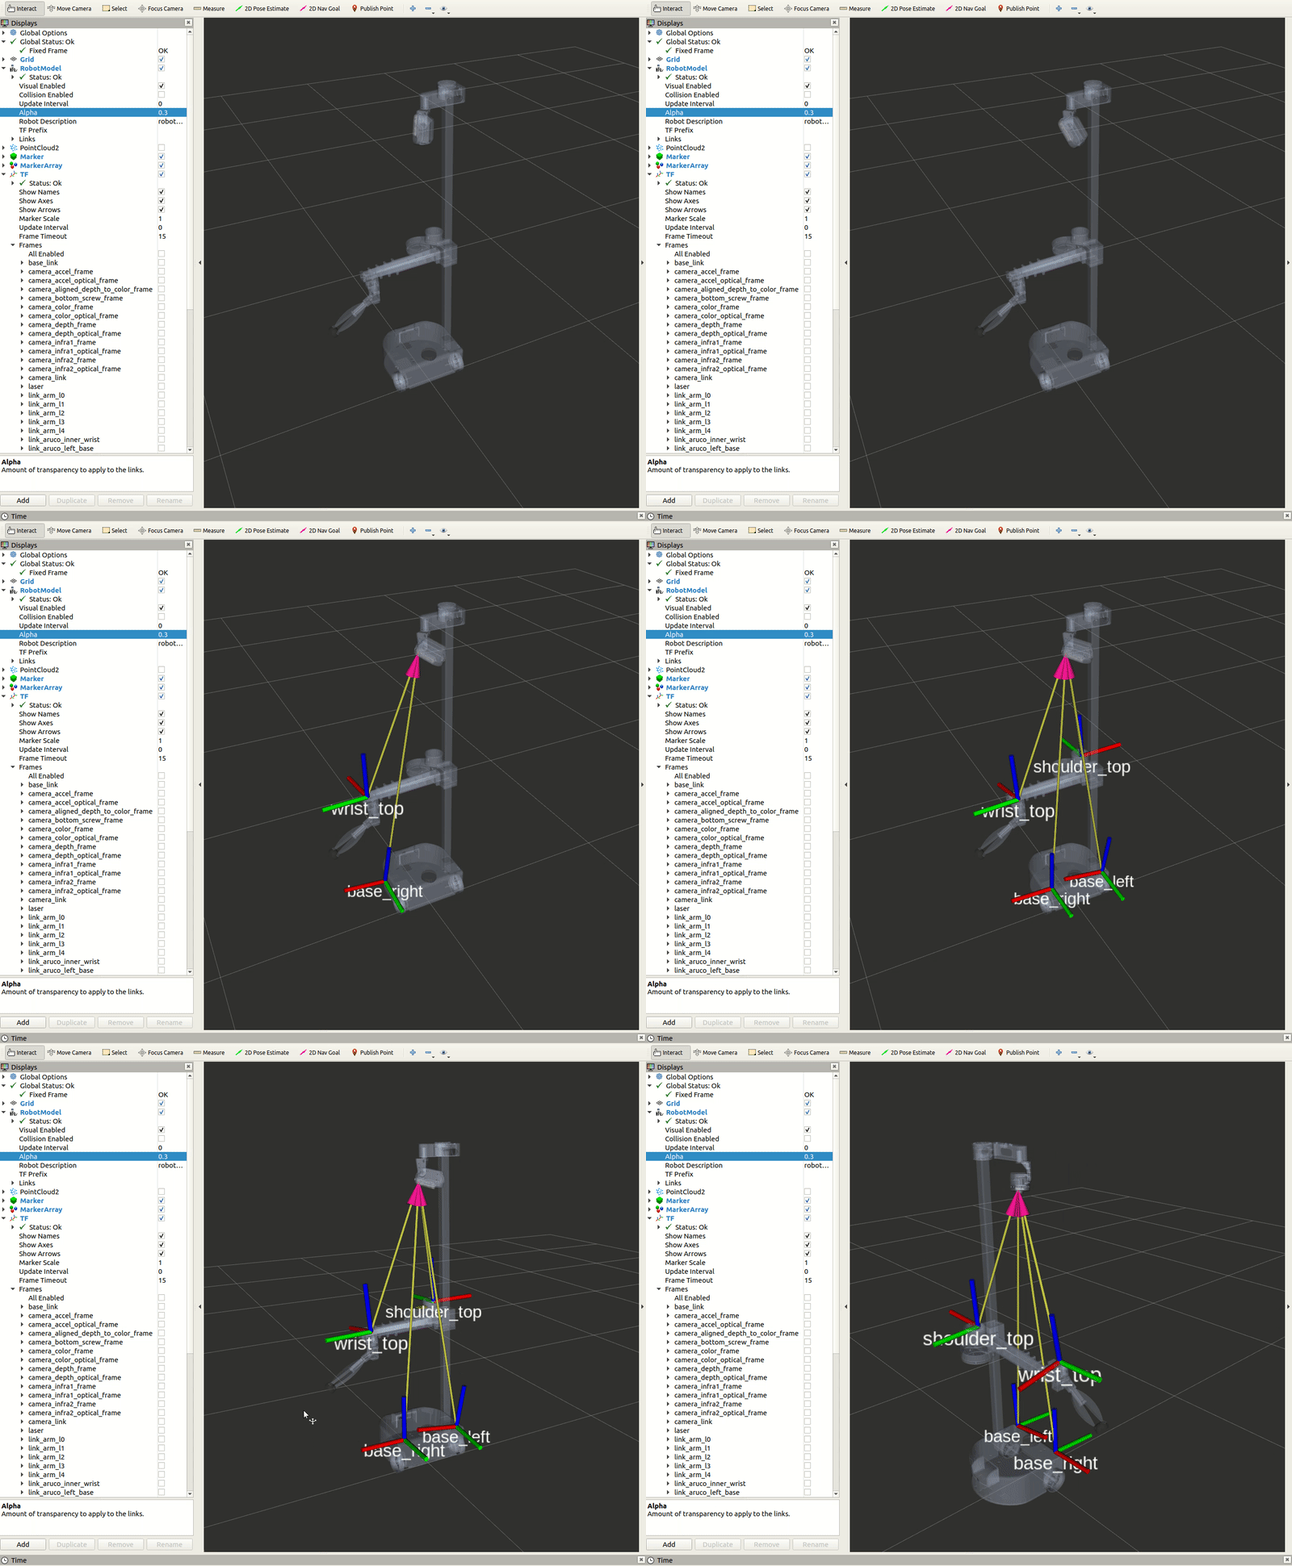
Within this tutorial package, there is an RViz config file with the topics for the transform frames in the Display tree. You can visualize these topics and the robot model by running the command below in a new terminal.
rosrun rviz rviz -d /home/hello-robot/catkin_ws/src/stretch_tutorials/rviz/aruco_detector_example.rviz
You are going to need to teleoperate Stretch's head to detect the ArUco marker tags. Run the following command in a new terminal and control the head to point the camera toward the markers.
rosrun stretch_core keyboard_teleop

The ArUco Marker Dictionary
When defining the ArUco markers on Stretch, hello robot utilizes a YAML file, stretch_marker_dict.yaml, that holds the information about the markers.
If detect_aruco_markers node doesn’t find an entry in stretch_marker_dict.yaml for a particular ArUco marker ID number, it uses the default entry. For example, most robots have shipped with the following default entry:
'default':
  'length_mm': 24
  'use_rgb_only': False
  'name': 'unknown'
  'link': None
and the following entry for the ArUco marker on the top of the wrist
'133':
  'length_mm': 23.5
  'use_rgb_only': False
  'name': 'wrist_top'
  'link': 'link_aruco_top_wrist'
Dictionary Breakdown
'133':
The dictionary key for each entry is the ArUco marker’s ID number or default. For example, the entry shown above for the ArUco marker on the top of the wrist assumes that the marker’s ID number is 133.
'length_mm': 23.5
The length_mm value used by detect_aruco_markers is important for estimating the pose of an ArUco marker.
Note
If the actual width and height of the marker do not match this value, then pose estimation will be poor. Thus, carefully measure custom Aruco markers.
'use_rgb_only': False
If use_rgb_only is True, detect_aruco_markers will ignore depth images from the Intel RealSense D435i depth camera when estimating the pose of the marker and will instead only use RGB images from the D435i.
'name': 'wrist_top'
name is used for the text string of the ArUco marker’s ROS Marker in the ROS MarkerArray Message published by the detect_aruco_markers ROS node.
'link': 'link_aruco_top_wrist'
link is currently used by stretch_calibration. It is the name of the link associated with a body-mounted ArUco marker in the robot’s URDF.
It’s good practice to add an entry to stretch_marker_dict.yaml for each ArUco marker you use.
Create a New ArUco Marker
At Hello Robot, we’ve used the following guide when generating new ArUco markers.
We generate ArUco markers using a 6x6-bit grid (36 bits) with 250 unique codes. This corresponds with DICT_6X6_250 defined in OpenCV. We generate markers using this online ArUco marker generator by setting the Dictionary entry to 6x6 and then setting the Marker ID and Marker size, mm as appropriate for the specific application. We strongly recommend measuring the actual marker by hand before adding an entry for it to stretch_marker_dict.yaml.
We select marker ID numbers using the following ranges.
- 0 - 99: reserved for users
- 100 - 249: reserved for official use by Hello Robot Inc.
- 100 - 199: reserved for robots with distinct sets of body-mounted markers
- Allows different robots near each other to use distinct sets of body-mounted markers to avoid confusion. This could be valuable for various uses of body-mounted markers, including calibration, visual servoing, visual motion capture, and multi-robot tasks.
- 5 markers per robot = 2 on the mobile base + 2 on the wrist + 1 on the shoulder
- 20 distinct sets = 100 available ID numbers / 5 ID numbers per robot
- 200 - 249: reserved for official accessories
- 245 for the prototype docking station
- 246-249 for large floor markers
When coming up with this guide, we expected the following:
- Body-mounted accessories with the same ID numbers mounted to different robots could be disambiguated using the expected range of 3D locations of the ArUco markers on the calibrated body.
- Accessories in the environment with the same ID numbers could be disambiguated using a map or nearby observable features of the environment.