
Emulating the Wacc
In this tutorial we describe how to emulate the Arduino based Stretch Wacc (Wrist + Accelerometer) board using an off-the-shelf Arduino. This enables users to develop and test custom code for the Wacc board prior to deploying it to the actual robot hardware.
Emulation involves:
- Installing the Wacc firmware on an Arduino Zero compatible board ( Adafruit Metro M0 Express )
- Mapping the UDEV rules to the Metro
This tutorial assumes the Metro board is plugged into one of Stretch's external USB ports. It is also possible to install Stretch Body on a developer Ubuntu machine if the robot is not available (see below).
Hardware
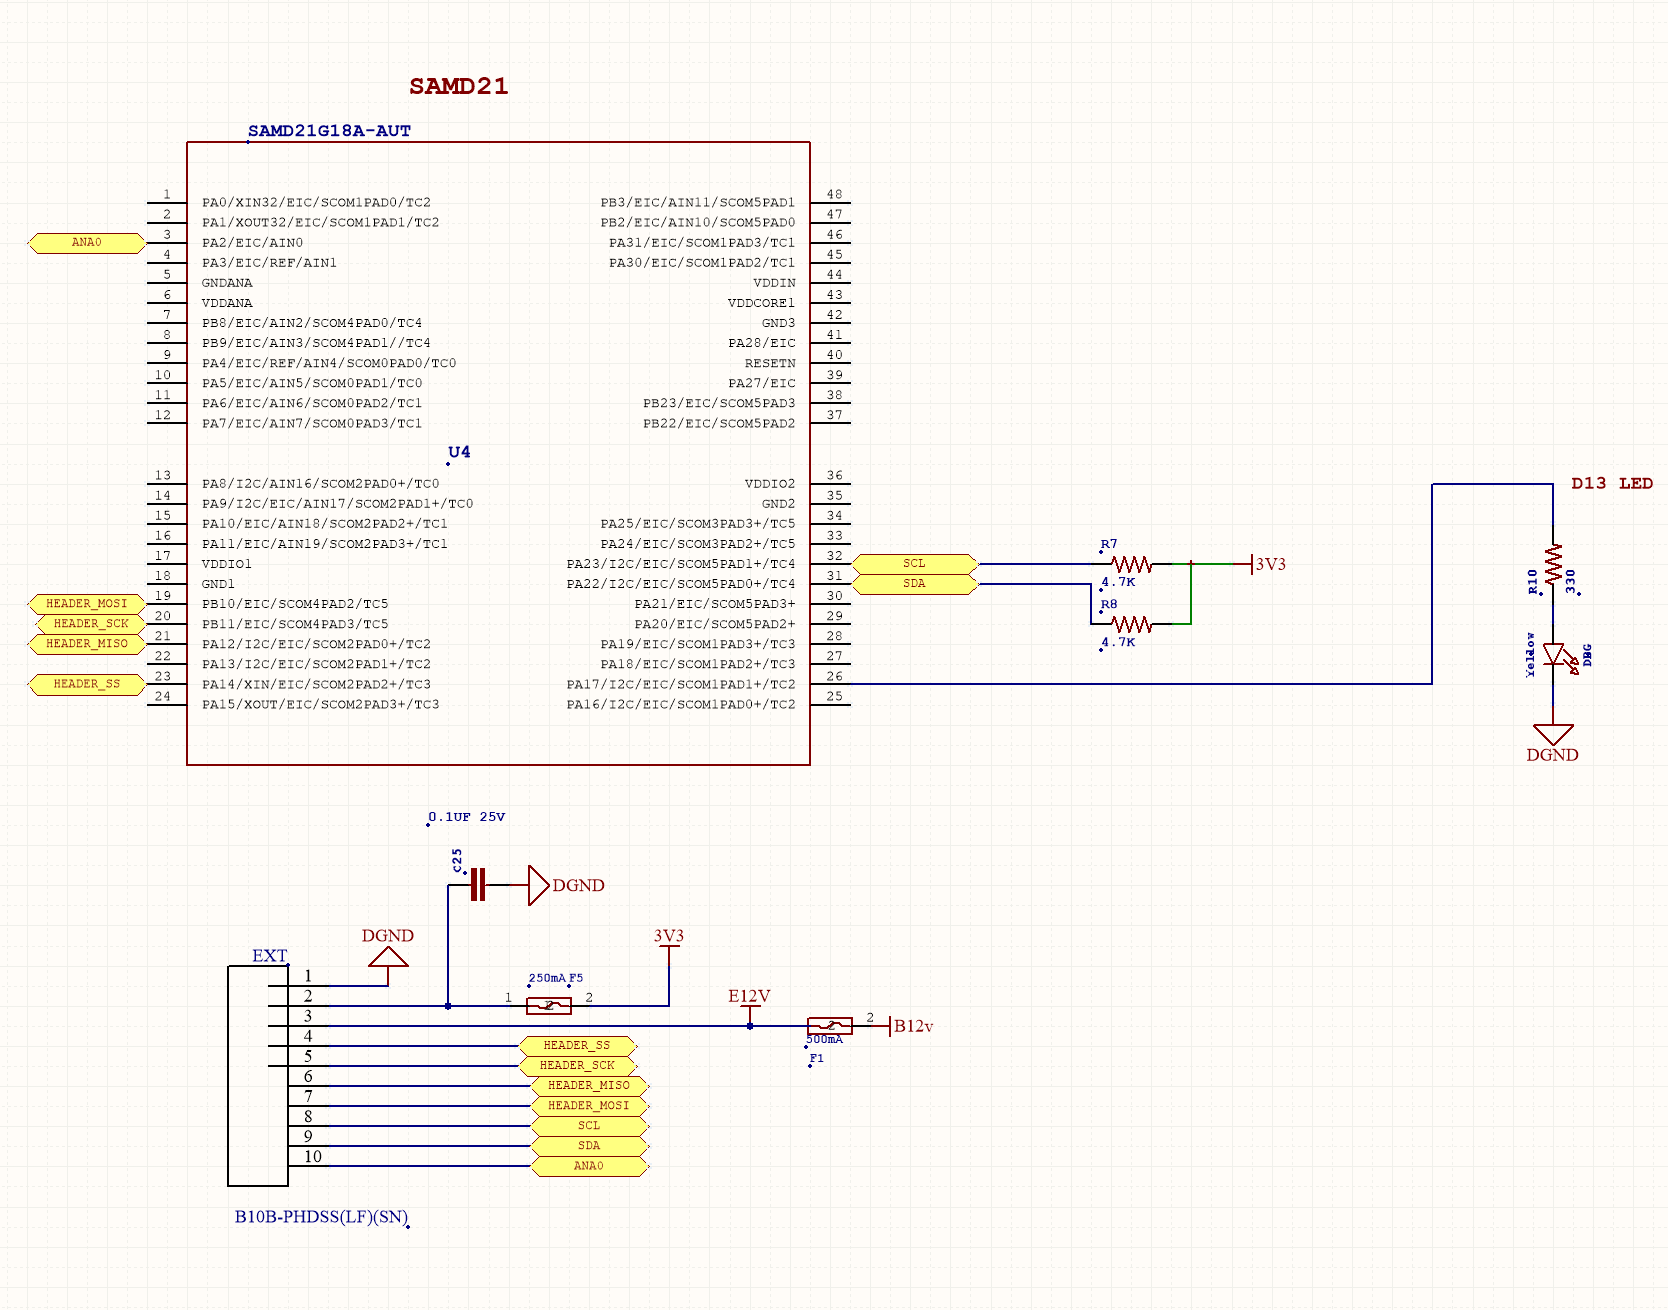
We will emulate the Wacc on the Metro board as both boards use the Atmel SAMD21G18A-AUT processor.
The primary difference between the Wacc and the Metro is that the Wacc integrates an ADXL343 3 axis accelerometer on its I2C bus. As this chip isn't interfaced to our emulation hardware, this data will be missing. The Wacc also lacks the On/Off switch and RGB LED of the Metro.
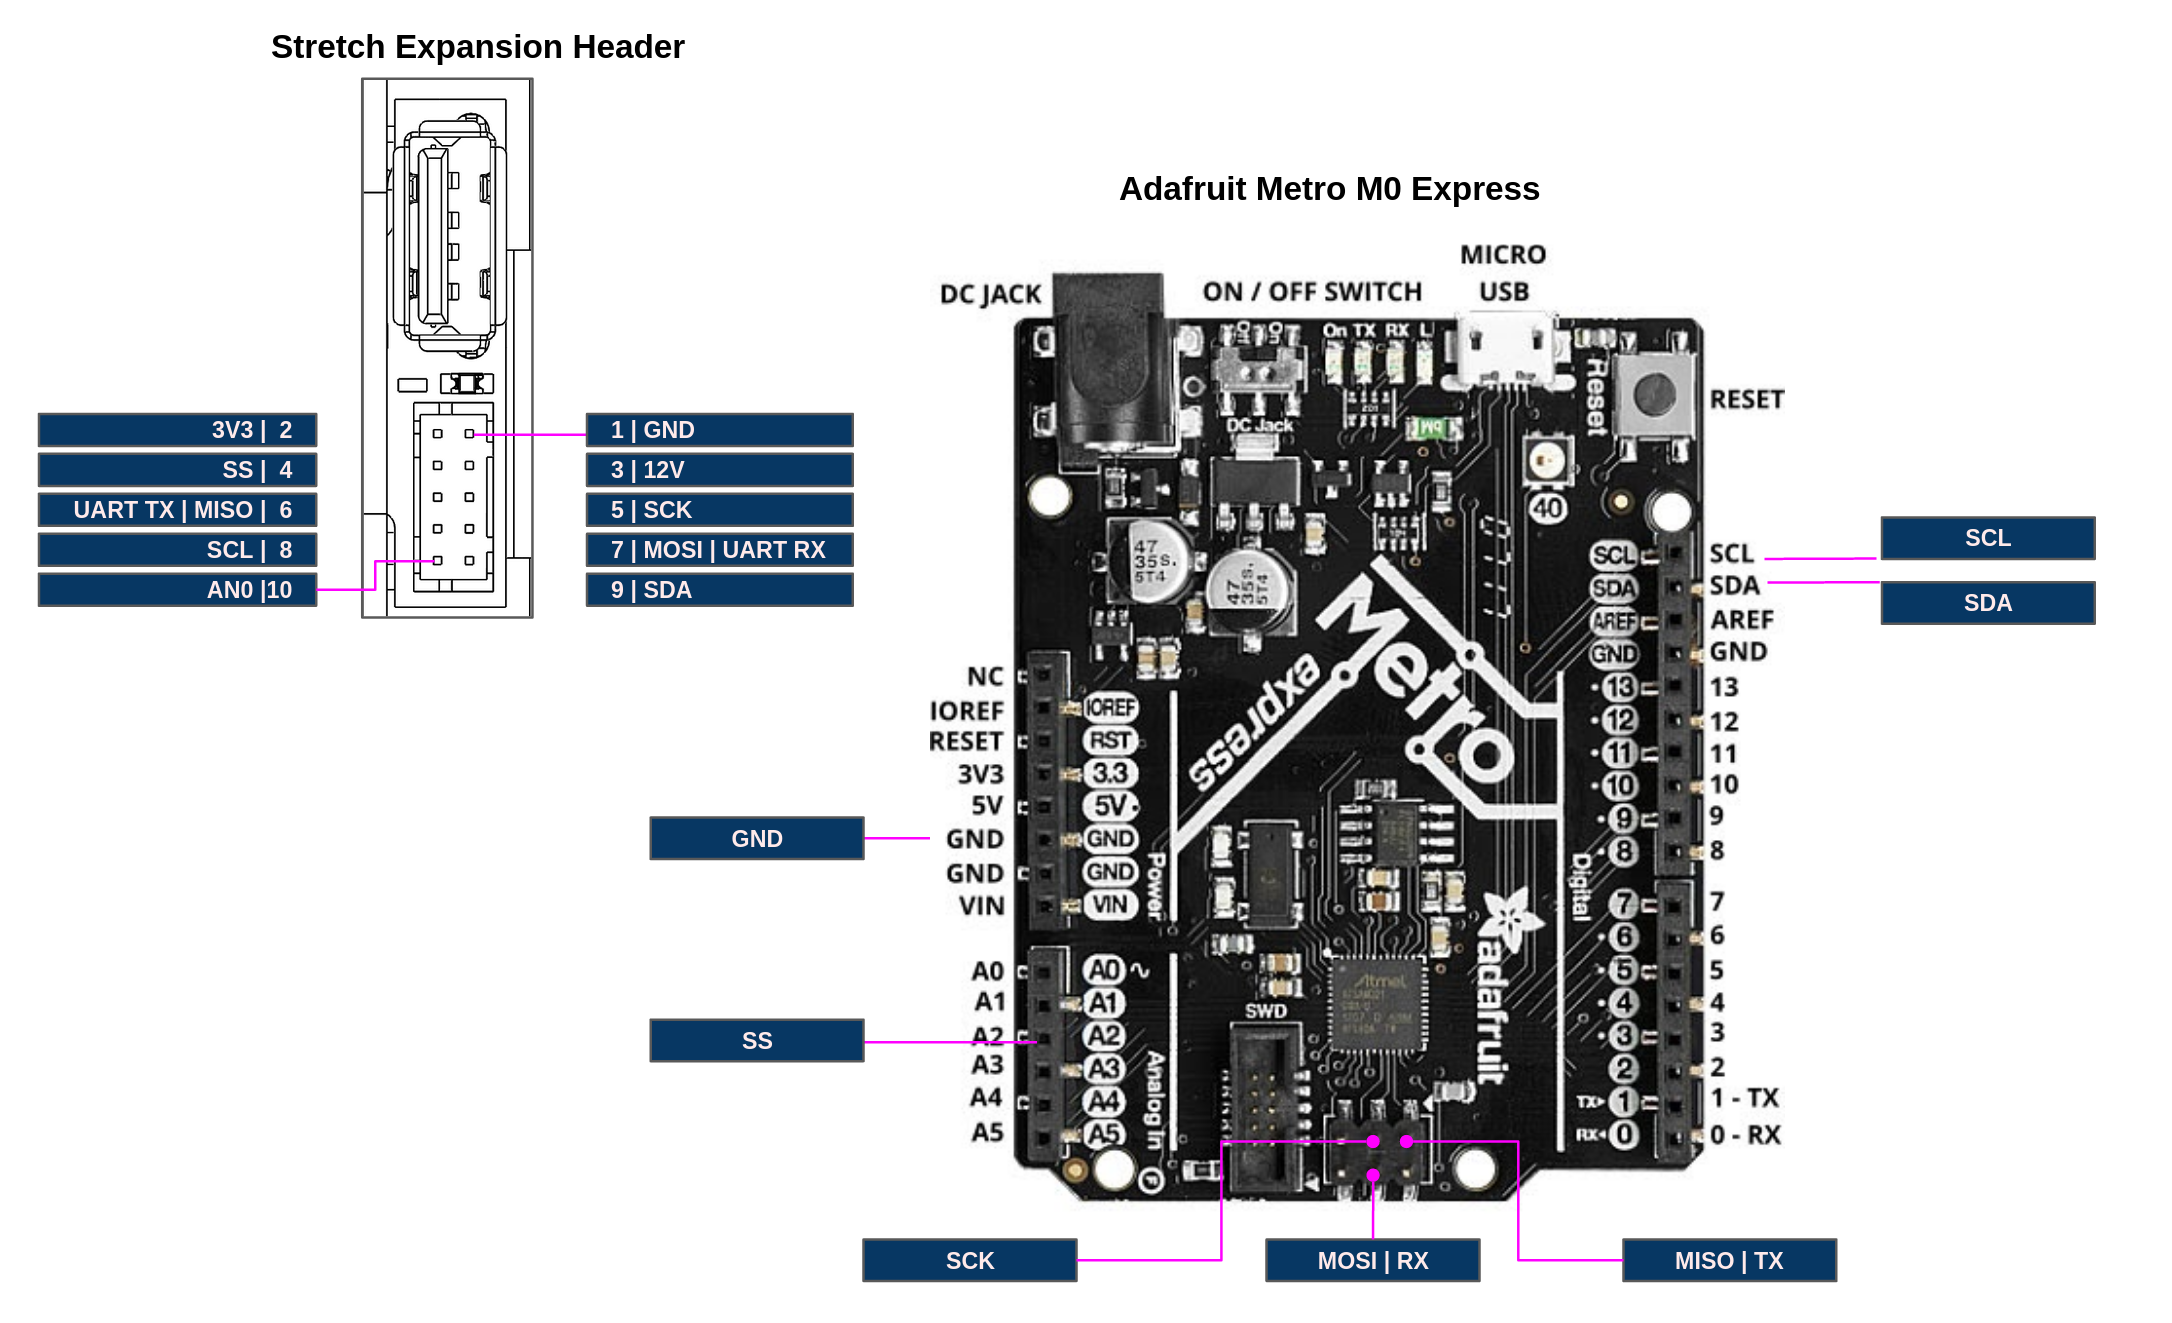
Only a subset of its pins of the Wacc (shown below) are used compared to the Metro. You can attach your custom hardware to the Metro as if it were the Stretch Expansion Header.
Firmware
First, we'll install the factory Wacc firmware on the Metro. Custom Wacc firmware could be installed using the same process.
First, download the firmware repo onto the development machine if it isn't already there:
>>$ cd ~/repos
>>$ git clone https://github.com/hello-robot/stretch_firmware
Next, install and setup the Arduino IDE has described here.
Now, with the Metro M0 plugged in to a USB port on Stretch:
- Open the hello_wacc sketch
- Select Tools/Board/Hello Wacc
- Select the Metro board under Tools/Port
- Upload the firmware. The red LED on the Metro should flash at 1Hz.
Note: Take care to not accidentally burn firmware to the wrong board. You can check the mapping of boards to ports by:
>>$ ls -l /dev/hello*
Setup UDEV
Next we need for the Metro to appear as a device named /dev/hello-wacc. For this:
- Run 'sudo dmesg -c' to clear the system log
- Hit the reset button on the Metro
- Run 'sudo dmesg | grep Serial
You'll see the Metro serial number:
>>$ sudo dmesg -c | grep Serial
[810971.303719] usb 1-3: New USB device strings: Mfr=1, Product=2, SerialNumber=3
[810971.303725] usb 1-3: SerialNumber: 9261CC655150484735202020FF0C270C
Copy the serial number. Edit the udev file:
>>$ sudo nano /etc/udev/rules.d/95-hello-arduino.rules
Find the entry for hello-wacc and update ATTRS{serial} to the new serial number.
KERNEL=="ttyACM*", ATTRS{idVendor}=="2341", ATTRS{idProduct}=="804d",MODE:="0666", ATTRS{serial}=="SERIAL", SYMLINK+="hello-wacc", ENV{ID_MM_DEVICE_IGNORE}="1"
, where SERIAL is the serial number captured from dmesg.
Now reload the udev rule
>>$ sudo udevadm control --reload
Now hit the reset button of the Metro and check that it is mapped:
>>$ ls -l /dev/hello-wacc
lrwxrwxrwx 1 root root 7 Jun 10 20:04 /dev/hello-wacc -> ttyACM0
Note: When switching back to Stretch's internal Wacc board you'll need to restore the UDEV file. This can be done by:
>>$ sudo cp $HELLO_FLEET_PATH/$HELLO_FLEET_ID/udev/95-hello-arduino.rules /etc/udev/rules.d/
Test the Emulated Wacc
Now, check that your emulated Wacc is working. You should see the Timestamp and A0 values moving when you hit 'Enter'. Now you're ready to integrate your custom hardware.
>>$ stretch_wacc_jog.py
------ MENU -------
m: menu
r: reset board
a: set D2 on
b: set D2 off
c: set D3 on
d: set D3 off
-------------------

------------------------------
Ax (m/s^2) 0.0
Ay (m/s^2) 0.0
Az (m/s^2) 0.0
A0 375
D0 (In) 1
D1 (In) 1
D2 (Out) 0
D3 (Out) 0
Single Tap Count 0
State  0
Debug 0
Timestamp 1591846120.85
Board version: Wacc.Guthrie.V1
Firmware version: Wacc.v0.0.1p0