Example 4
Example 4
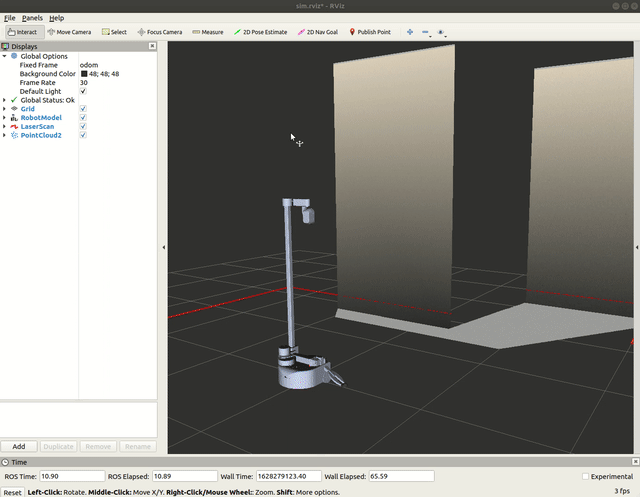
Let's bringup stretch in the willowgarage world from the gazebo basics tutorial and RViz by using the following command.
# Terminal 1
roslaunch stretch_gazebo gazebo.launch world:=worlds/willowgarage.world rviz:=true
rviz flag will open an RViz window to visualize a variety of ROS topics. In a new terminal run the following commands to execute the marker.py node.
# Terminal 2
cd catkin_ws/src/stretch_tutorials/src/
python marker.py
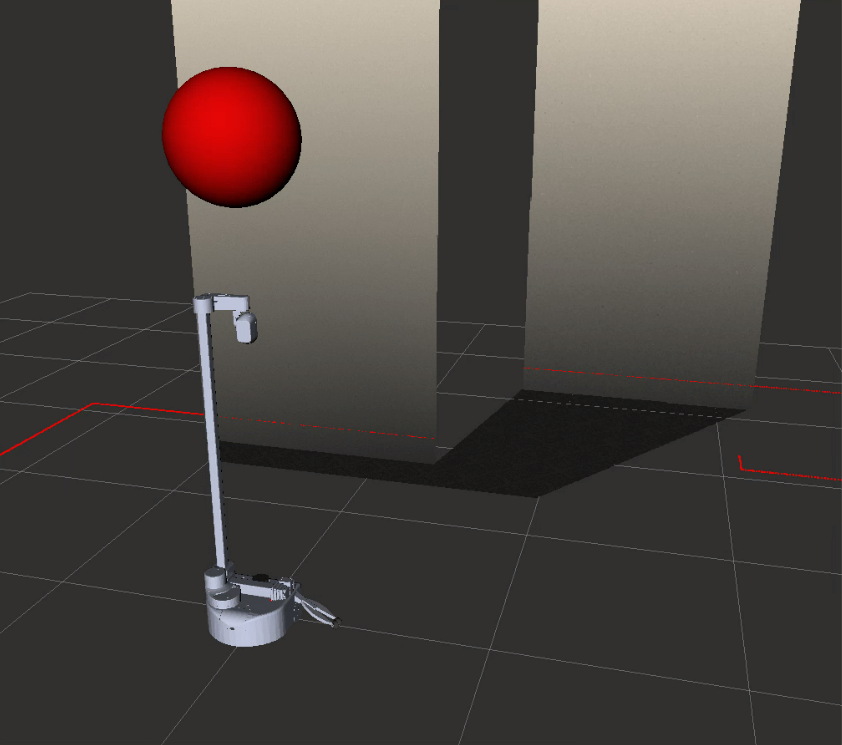
Marker display type, and change the topic name from /visualization_marker to /balloon. A red sphere Marker should appear above the Stretch robot.
The Code
#!/usr/bin/env python

import rospy
from visualization_msgs.msg import Marker

class Balloon():
    """
    A class that attaches a Sphere marker directly above the Stretch robot.
    """
    def __init__(self):
        """
        Function that initializes the marker's features.
        :param self: The self reference.
        """
        self.publisher = rospy.Publisher('balloon', Marker, queue_size=10)
        self.marker = Marker()
        self.marker.header.frame_id = 'base_link'
        self.marker.header.stamp = rospy.Time()
        self.marker.type = self.marker.SPHERE
        self.marker.id = 0
        self.marker.action = self.marker.ADD
        self.marker.scale.x = 0.5
        self.marker.scale.y = 0.5
        self.marker.scale.z = 0.5
        self.marker.color.r = 1.0
        self.marker.color.g = 0.0
        self.marker.color.b = 0.0
        self.marker.color.a = 1.0
        self.marker.pose.position.x = 0.0
        self.marker.pose.position.y = 0.0
        self.marker.pose.position.z = 2.0
        rospy.loginfo("Publishing the balloon topic. Use RViz to visualize.")

    def publish_marker(self):
        """
        Function that publishes the sphere marker.
        :param self: The self reference.

        :publishes self.marker: Marker message.
        """
        self.publisher.publish(self.marker)


if __name__ == '__main__':
    rospy.init_node('marker')
    balloon = Balloon()
    rate = rospy.Rate(10)

    while not rospy.is_shutdown():
        balloon.publish_marker()
        rate.sleep()
The Code Explained
Now let's break the code down.
#!/usr/bin/env python
import rospy
from visualization_msgs.msg import Marker
rospy if you are writing a ROS Node. Import the Marker type from the visualization_msgs.msg package. This import is required to publish a Marker, which will be visualized in RViz.
self.pub = rospy.Publisher('balloon', Marker, queue_size=10)
pub = rospy.Publisher("balloon", Twist, queue_size=1) declares that your node is publishing to the /ballon topic using the message type Twist.
self.marker = Marker()
self.marker.header.frame_id = 'base_link'
self.marker.header.stamp = rospy.Time()
self.marker.type = self.marker.SPHERE
Marker() message type. Markers of all shapes share a common type. Set the frame ID and type. The frame ID is the frame in which the position of the marker is specified. The type is the shape of the marker. Further details on marker shapes can be found here: RViz Markers
self.marker.id = 0
self.marker.action = self.marker.ADD
self.marker.scale.x = 0.5
self.marker.scale.y = 0.5
self.marker.scale.z = 0.5
self.marker.color.r = 1.0
self.marker.color.g = 0.0
self.marker.color.b = 0.0
self.marker.color.a = 1.0
self.marker.pose.position.x = 0.0
self.marker.pose.position.y = 0.0
self.marker.pose.position.z = 2.0
frame_id. In this case, the position will always be directly 2 meters above the frame_id (base_link), and will move with it.
def publish_marker(self):
        self.publisher.publish(self.marker)
rospy.init_node('marker', argv=sys.argv)
balloon = Balloon()
rate = rospy.Rate(10)
rospy.init_node(NAME, ...), is very important as it tells rospy the name of your node -- until rospy has this information, it cannot start communicating with the ROS Master. NOTE: the name must be a base name, i.e. it cannot contain any slashes "/".
Instantiate class with Balloon()
Give control to ROS with rospy.spin(). This will allow the callback to be called whenever new messages come in. If we don't put this line in, then the node will not work, and ROS will not process any messages.
while not rospy.is_shutdown():
    balloon.publish_marker()
    rate.sleep()
rospy.is_shutdown() flag and then doing work. You have to check is_shutdown() to check if your program should exit (e.g. if there is a Ctrl-C or otherwise). The loop calls rate.sleep(), which sleeps just long enough to maintain the desired rate through the loop.